Prestashop is one of the most popular content management systems used for e-commerce. It is used by small and large businesses and powers about 300 000 sites around the world. Prestashop sites can be enhanced using thousands of addons available directly in the Prestashop Addons Marketplace. In this article you will learn how to install Prestashop 8 locally.
For this tutorial we will expose how to install Prestashop 8 on your computer using XAMPP within few minutes.
Prestashop system requirements
In order to install Prestashop, the following configuration is needed:
- Web server Apache Web Server 2.4 or any higher version. (Although compatible, Apache Web Server 2.2 is not recommended since it reached its EOL in 2018).
- It is recommended to use PHP 8.1. or higher (Although compatible, PHP 7.2.5 to 8.0 are not recommended since they reached their end of support.)
- SQL MySQL 5.6 minimum or MariaDB 10.0 minimum, a recent version is recommended.
- Server RAM The more the best. We recommend setting the memory allocation per script (memory_limit) to a minimum of 256M.
It is recommended to set the memory allocation per script (memory_limit) to a minimum of 256M in the php.ini file.
The ways to install Prestashop
As mentioned above, you can install Prestashop locally on your computer or you can install it on a web server connected to internet.
There is two main methods to install Prestashop:
- The manual method (Locally or on a web server): This method gives you the maximum of control over installation and setup. This is the method that we will detail in this tutorial.
- One-click installation (or Automated installation) on a web server: This is a service offered by several hosting providers around the world. It allows you to install Prestashop (Or other CMSs) quickly and easily using the hosting provider’s installation scripts.
How to install Prestashop locally using XAMPP
1. Download and install XAMPP on your computer
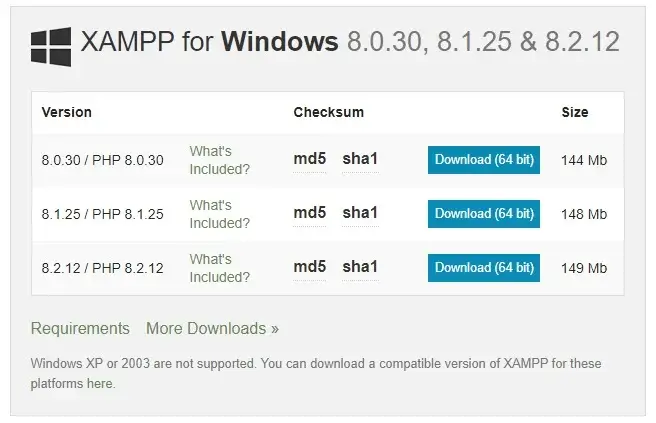
Before installing your CMS you need to set up the environnement, this is one of the most important steps. This can be done by installing a server/database package as XAMPP which includes PHP, Apache Web Server and MySQL as a database system.
- Go to WAMPP official download page and choose the version that aligns with your operating system. For this example we use Windows 10. Make sure to choose the option that works best with the latest PHP version.
- Once the download is finished, you should run the installer. This will launch XAMPP installation process.
- Once the installation is complete, open the XAMPP control panel. Make sure to check Apache and MySQL options. This is necessary to install and run Prestashop.
Once the XAMPP software is installed, you have to make sure that the following PHP extensions are activated and also that the following settings configured:
Extensions
- CURL. The Client URL extension is used to download remote resources like modules and localization packages.
- DOM. The DOM extension is needed to parse XML documents. PrestaShop uses it for various functionalities, like the Store Locator. It is also used by some modules, as well as the pear_xml_parse library.
- Fileinfo. The File information extension is used to find out the file type of uploaded files.
- GD. The GD extension is used to create thumbnails for the images that you upload.
- Iconv. The ICONV extension is used to convert character sets.
- Intl. The Internationalization extension is used to display localized data, such as amounts in different currencies.
- JSON. The JSON extension is used to manage JSON format.
- Mbstring. The Multibyte string extension to perform string operations everywhere.
- OpenSSL. The OpenSSL extension is used to improve security.
- PDO. The PHP Data Objects extension is used to connect to databases.
- PDO (MySQL). The PDO_MYSQL driver is used to connect to MySQL databases.
- SimpleXML. The SimpleXML extension is used to manage XML files.
- Zip. The Zip extension is used to expand compressed files such as modules and localization packages.
Settings
allow_url_fopenmust be enabled.
2. Download and extract Prestashop files
- Download the latest Prestashop 8 package from the official web site.
- Navigate to XAMPP folder in C drive (C:\xampp) then go to htdocs folder. Create a new folder with the name of your Prestashop website (For this example we will name the folder “prestatest”) and extract the files of the downloaded ZIP file in this folder.
3. Create a local database
- In XAMPP Control Panel select the Admin button of MySQL module. That will launch PhpMyAdmin on your default web browser.
- Open Databases tab, enter the database name, set the drop-down menu to to Collation then click on Create. Your new database should be created and it will appear on the left sidebar of PhpMyAdmin.
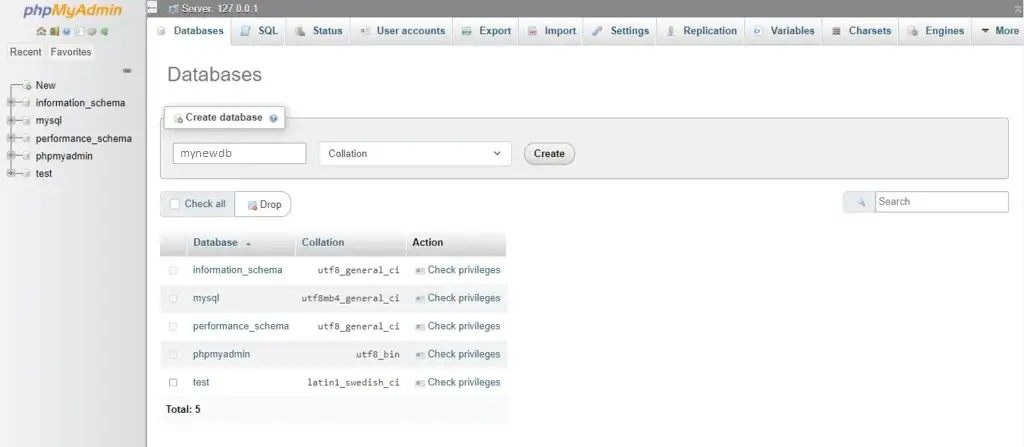
Note: You can usually access PhpMyAdmin at http://localhost/phpmyadmin, depending on your port configuration. For example: http://localhost:80/phpmyadmin/.
4. Launch Prestashop installer
Now you are ready to install Prestashop. Using your web browser, start the Prestashop installer by browsing to the link http://localhost/prestatest where “prestatest” is the name of the folder where you previously stored the Prestashop files.
Welcome page
The following Welcome page will be displayed.
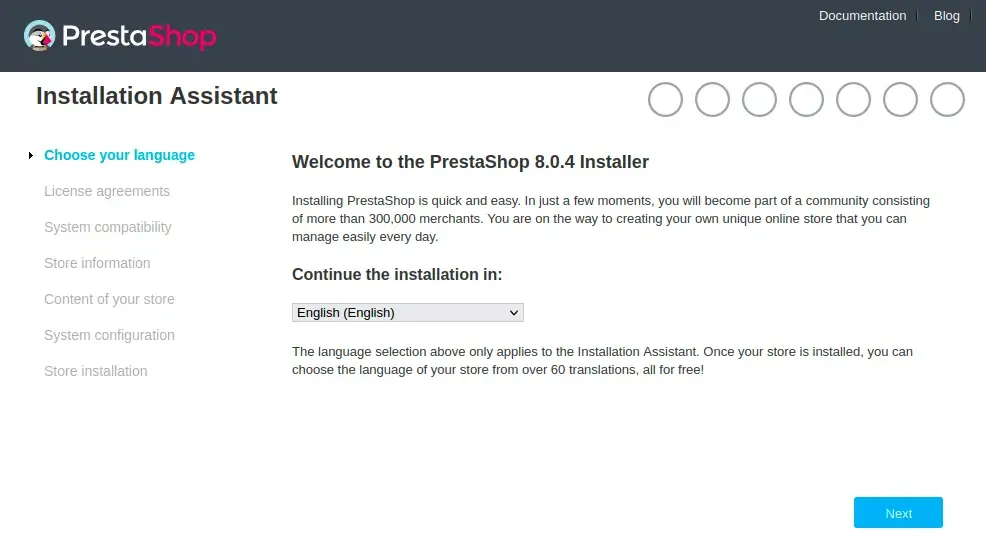
Select the installer language with which you will continue the installation, then click Next button.
The selected language will be also the default language for your store. You can change it later and add more languages.
Prestashop’s licences
The next page that will be displayed is the Prestashop’s Licence agreement page.
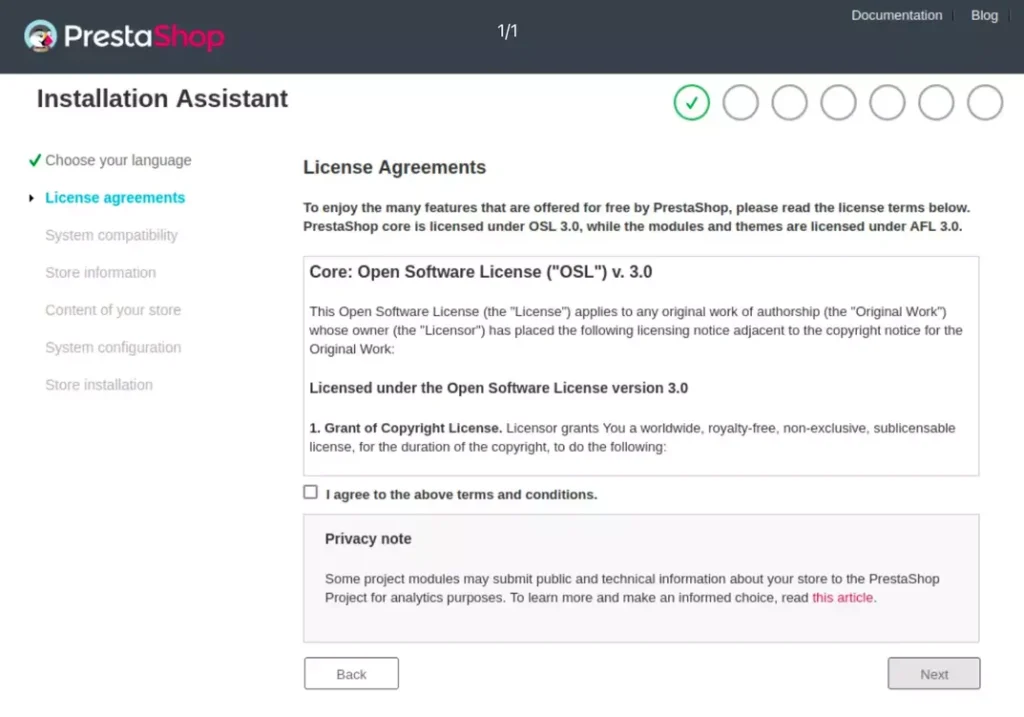
Note that PrestaShop is free and distributed under a Open Software Licence v3.0 (OSL) and the modules are distributed under the Academic Free Licence V3.0 (AFL). You must accept the terms of the licences to continu the installation.
Read the licence terms, check the checkbox “I agree to the above terms and conditions”, then click Next button.
System compatibility
After accepting the licences, you will be redirected to the system compatibility page. This page will check that everything is OK on the server configuration: PHP version, PHP configuration, PHP extensions, files and folders permissions, etc.
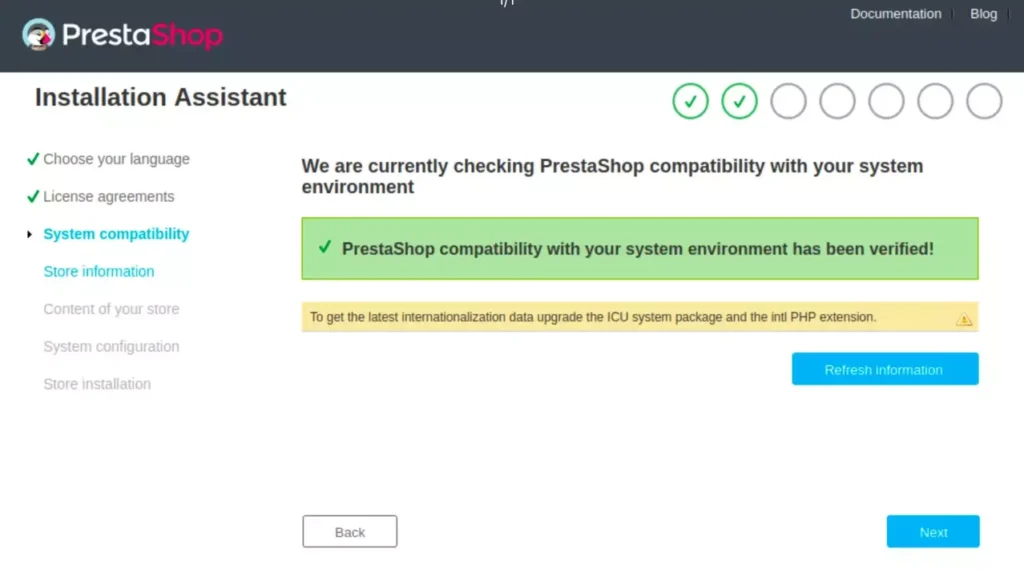
If something is not OK, the installer will stop here and it will display an error message with technical details of the items to correct.
Here is a list of the checks that are performed during this step with how to fix them:
| PrestaShop checks: | How can I fix it? (check for…) |
|---|---|
| Is the minimum or newer compatible PHP version installed? | webserver |
| Can PrestaShop upload files? | php.ini file (file_uploads) |
| Can PrestaShop create new files and folders? | File browser / FTP client / command line |
| Is the GD Library installed? | php.ini file (extension=php_gd2.so) |
| Is MySQL support is on? | php.ini file (extension=php_pdo_mysql.so) |
| Recursive write permission on ~/config/ | Permissions: File browser / FTP client / command line |
| Recursive write permission on ~/cache/ | Permissions: File browser / FTP client / command line |
| Recursive write permission on ~/log/ | Permissions: File browser / FTP client / command line |
| Recursive write permission on ~/img/ | Permissions: File browser / FTP client / command line |
| Recursive write permission on ~/mails/ | Permissions: File browser / FTP client / command line |
| Recursive write permission on ~/modules/ | Permissions: File browser / FTP client / command line |
| Recursive write permission on ~/override/ | Permissions: File browser / FTP client / command line |
| Recursive write permission on ~/themes/default_theme_name/lang/ | Permissions: File browser / FTP client / command line |
| Recursive write permission on ~/themes/default_theme_name/pdf/lang/ | Permissions: File browser / FTP client / command line |
| Recursive write permission on ~/themes/default_theme_name/cache/ | Permissions: File browser / FTP client / command line |
| Recursive write permission on ~/translations/ | Permissions: File browser / FTP client / command line |
| Recursive write permission on ~/upload/ | Permissions: File browser / FTP client / command line |
| Recursive write permission on ~/download/ | Permissions: File browser / FTP client / command line |
| Recursive write permission on ~/app/config/ | Permissions: File browser / FTP client / command line |
| Recursive write permission on ~/app/Resources/translations/ | Permissions: File browser / FTP client / command line |
| Can PrestaShop open external URLs? | php.in file (allow_url_fopen) |
| Is PHP’s “register global” option off? | php.ini file (register_globals) |
| Is GZIP compression activated? | .htaccess file |
| Is the Mcrypt extension available? | php.ini file (see http://php.net/manual/en/mcrypt.setup.php) |
| Is PHP’s “magic quotes” option deactivated? | php.ini file (magic_quotes_gpc) |
| Is the Dom extension loaded? | --enable-dom compile time option |
| Is the PDO MySQL extension loaded? | php.ini file (extension=php_pdo_mysql.so) |
Store information
Then comes the next step: store information. In this step you will be asked to enter several informations about your new store and the admin account.
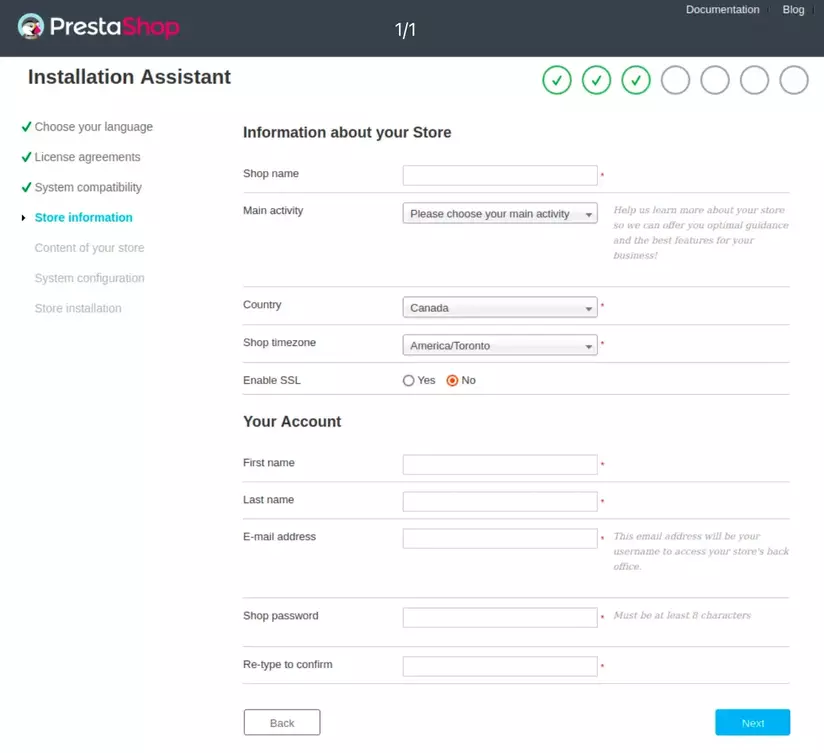
- Shop name: The name of your store
- Main activity: Choose from the liste the main activity of your store
- Country: Choose your country from the list
- Shop timezone: Choose your timezone from the list
- Enable SSL: Check “YES” to enable SSL or “NO” to disable it on your store. For the local installation it is recommended to keep SSL disabled unless you have configured SSL on your local web server.
- First name: The first name of the admin
- Last name: The last name of the admin
- E-mail address: The admin e-mail address that will be used to send several notifications. This e-mail address will be also used as the username to access the store’s back office.
- Shop password: The password of the admin
- Re-type to confirm: Re-type the admin password here to confirm it
Make sure to remember your admin password
After entering all the required information, click the Next button.
Content of your store
This step allows you to choose which additional modules to install on your store. You can also choose if you want to install the demo products or not.
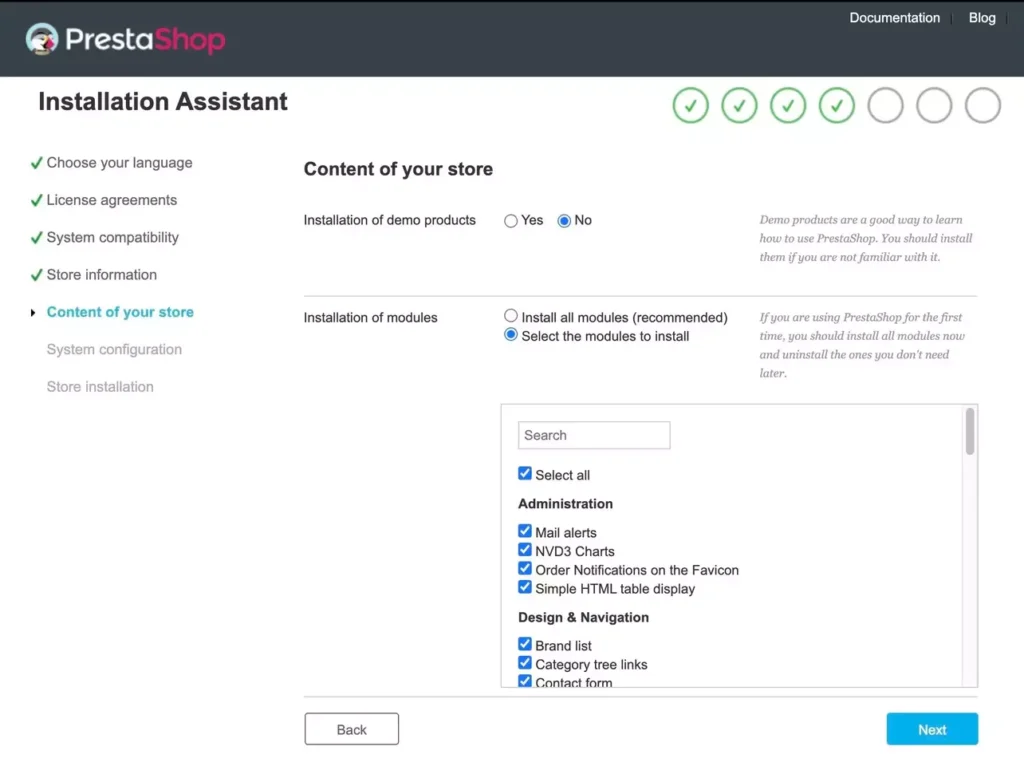
System configuration
In this page you will be asked to enter the database information such as:
- Database server address: in most cases either for a local installation or on a hosted web server, you will set it at 127.0.0.1 or at “localhost”. If it is not the case, you must enter the address of the database server.
- Database name: The name of the database that we created at the section 3 using PhpMyAdmin.
- Database login: The username used to connect to the database (Usually for local installation it is “root” by default unless you change it)
- Password: The password for the database user (not your Admin password). For local installation by default the database has no password (unless you changed it), let this field empty
- Tables Prefix: This is generated automatically as a security feature. You can accept the default prefix (PS_) or change it. Just don’t forget to put the underscore character (
_) at the end of the prefix. - Checkbox “Drop existing tables”: Check this box if the database you are using is not empty and contains tables (This is only available in “Dev mode”).
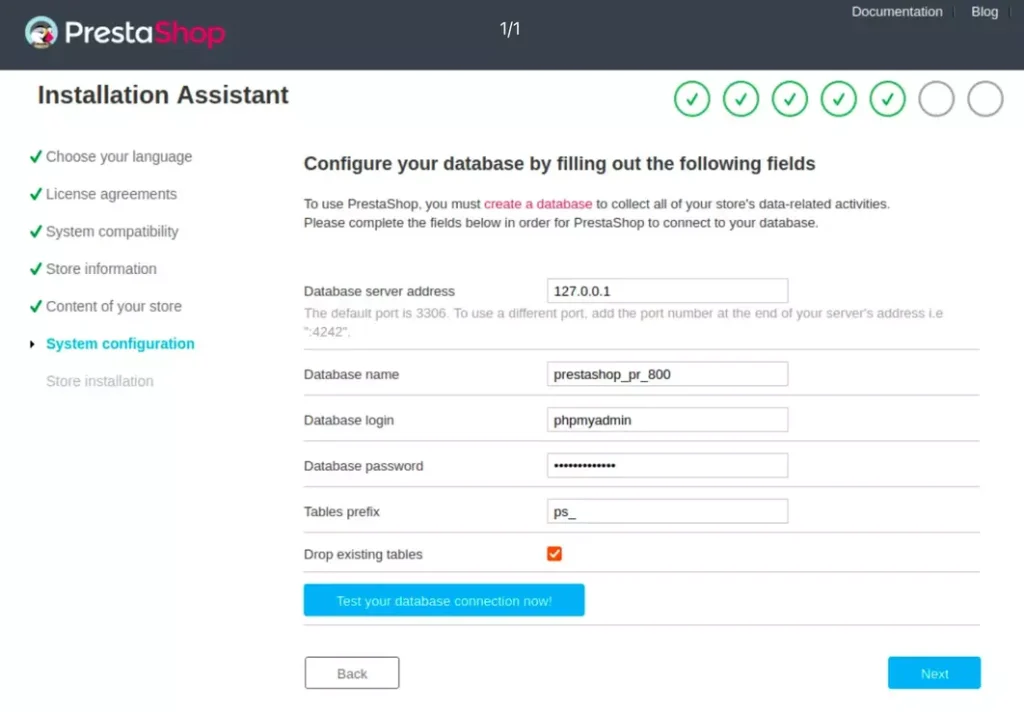
Once you enter all the information click the “Test your database connection now!” button in order to check that you used the correct server information. If everything is OK, a message will be displayed to informe you that the connection to the database is ok.
After that, click Next button to launch the installation program. This might take a few minutes. Keep the window open! Don’t close it!
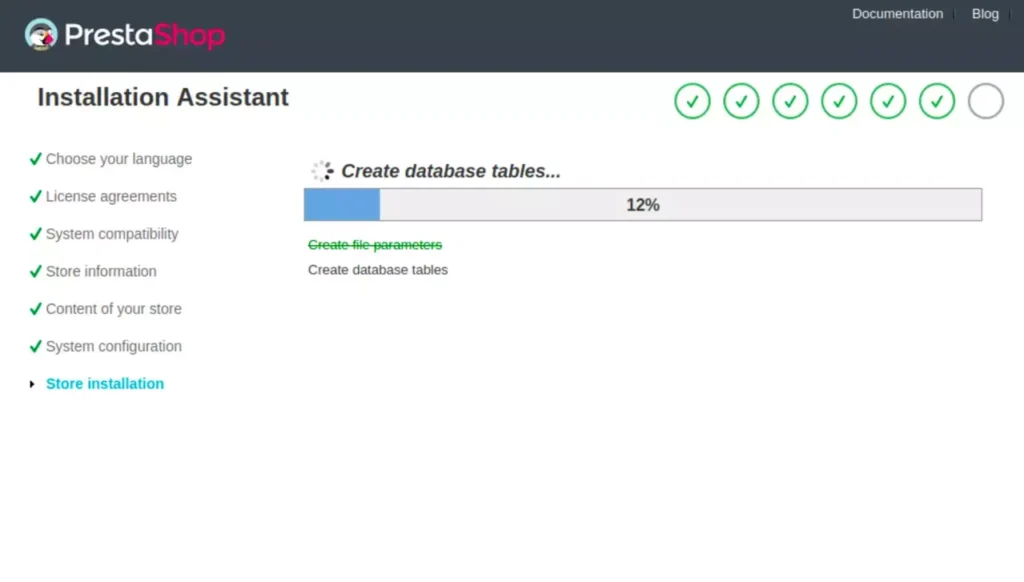
Once it is done, your store is installed and ready to be configured!
Finishing the installation
To complete the installation there an actions left before you can leave the installer. You must delete the install folder. To do so, navigate to XAMPP folder in C drive (C:\xampp) then go to htdocs folder then go to your site’s folder. Then delete the folder “install”.
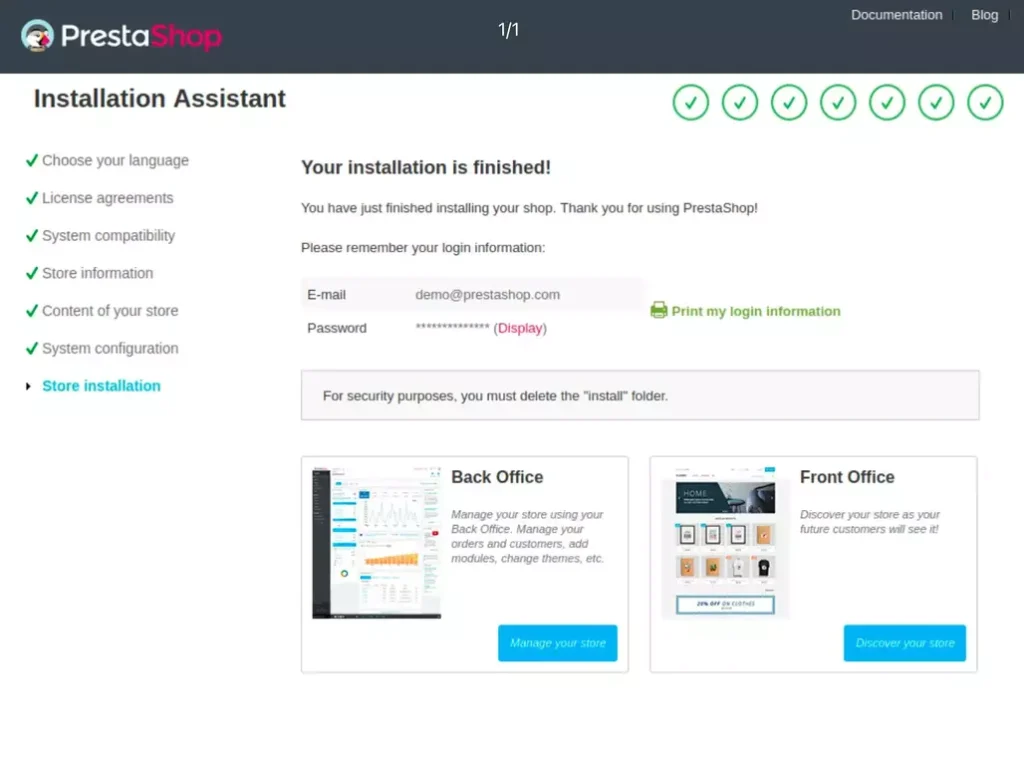
Now, go back to the browser and click on “Manage your store” to access your store’s administration panel. And click on “Discover your store” to access your store.
Prestashop configuration
Now, the installation of Prestashop is complete. To customize your Prestashop store, log in to your store’s back office and configure all the settings according to your needs.


