Joomla is one of the oldest and most used content management systems (CMS). It can be installed either locally using a development environnement such as XAMPP, or on a web server. The main versions of Joomla that are in use currently are the 3.x and the 4.x. (Joomla 5.x being the latest one, stills new and not very used by many websites yet). In this article we will cover how to install Joomla on your computer and how to upload it to a live server.
Requirements for Joomla installation
You need to fulfill some requirements to install Joomla. You will need to have PHP installed on your computer, you will also need a database system installed and finally a web server such as Apache. By installing XAMPP, you will get all those prerequisites installed. You will just need to make sure to install the recommended versions. Here are the official technical requirements for each Joomla version:
System requirements to install Joomla 3.x
| Software | Recommended | Minimum | More Information |
|---|---|---|---|
| PHP | 8.0 | 5.3.10 | https://www.php.net (Magic Quotes GPC, MB String Overload = off) (Zlib Compression Support, XML Support, INI Parser Support, JSON Support, MB Language = Default) |
| Supported Databases | |||
| MySQL | 5.5.3 + | 5.1 | https://www.mysql.com (InnoDB support required) |
| SQL Server | 10.50.1600.1 + | 10.50.1600.1 | https://www.microsoft.com/sql |
| PostgreSQL | 9.1 + | 8.3.18 | https://www.postgresql.org/ (ext/pgsql support in PHP has been removed. Now uses the PostgreSQL PDO Driver) |
| Supported Web Servers | |||
| Apache | 2.4 + | 2.0 | https://www.apache.org (with mod_mysql, mod_xml, and mod_zlib) |
| Nginx | 1.8 + | 1.0 | https://www.nginx.com/resources/wiki/ |
| Microsoft IIS | 7 | 7 | https://www.iis.net |
Be careful, Joomla 3.x has reached the end of life on 31 December 2014. There is no support for this version of Joomla!
System requirements to install Joomla 4.x
| Software | Recommended | Minimum | More Information |
|---|---|---|---|
| PHP | 8.2 | 7.2.5 | https://www.php.net Modules: json, simplexml, dom, zlib, gd, mysqlnd or pdo_mysql or pdo_pgsql |
| Supported Databases | |||
| MySQL | 8.0 + | 5.6 | https://www.mysql.com |
| PostgreSQL | 11.0 + | 11.0 | https://www.postgresql.org/ (ext/pgsql support in PHP has been removed. Now uses the PostgreSQL PDO Driver) |
| Supported Web Servers | |||
| Apache | 2.4 + | 2.4 | https://www.apache.org (with mod_mysql, mod_xml, and mod_zlib) |
| Nginx | 1.18 + | 1.10 | https://www.nginx.com/resources/wiki/ |
| Microsoft IIS | 10 + | 8 | https://www.iis.net |
Also it is recommended to set the following values in PHP.ini, the configuration file for PHP:
- memory_limit: 256M
- upload_max_filesize: 30 M (or more)
- post_max_size: 30 M (or more)
- max_execution_time: 30
The ways to install Joomla
As mentioned above, you can install Joomla locally on your computer or on a web server connected to internet.
There is two main methods to install Joomla:
- The manual method (Locally or on a web server): This method gives you the maximum of control over installation and setup. This option need more effort and time.
- One-click installation (or Automated installation) on a web server: This service is offered by several hosting providers. It allows you to install Joomla (And other CMSs) quickly and easily.
How to install Joomla 4.x locally step by step
1. Download and install XAMPP
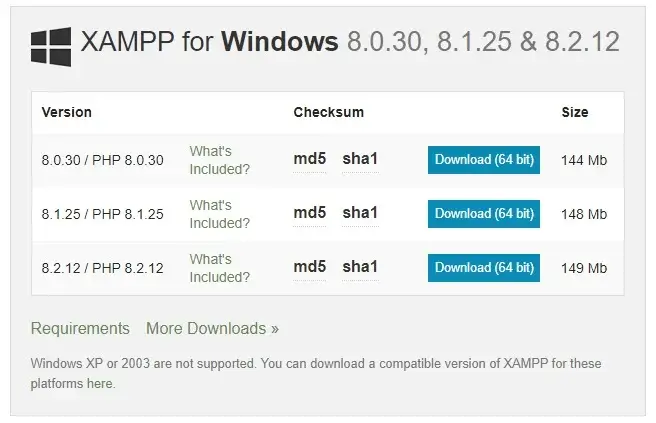
Before installing your CMS setting up the environnement is one of the most important steps. This can be done by installing a server/database package as XAMPP which includes PHP, Apache Web Server and MySQL as a database system.
- Go to WAMPP official download page and choose the version that aligns with your operating system. For this example Windows 10. Make sure to choose the option that works best with the latest PHP version.
- Once the download finished, you should run the installer. This will launch XAMPP installation guided process.
- Once the installation complete, launch the XAMPP control panel. Make sure to check Apache and MySQL options. This is necessary to install and run Joomla.
2. Download and extract Joomla files
- First download Joomla from the official download page.
- Navigate to XAMPP folder in C drive (C:\xampp) then go to htdocs folder. Create a folder with the name of your new Joomla website (For this example the folder will be named “yoursitename”) and extract the files of the downloaded ZIP file in this folder.
3. Create a local database
- Go to XAMPP Control Panel and select the Admin button of MySQL module. That will launch PhpMyAdmin (This is a database administration tool for MySQL and MariaDB databases) on your default web browser.
- Open Databases tab, enter the database name, set the drop-down menu to to Collation then click on Create. Your new database should be created and it will appear on the left sidebar of PhpMyAdmin.
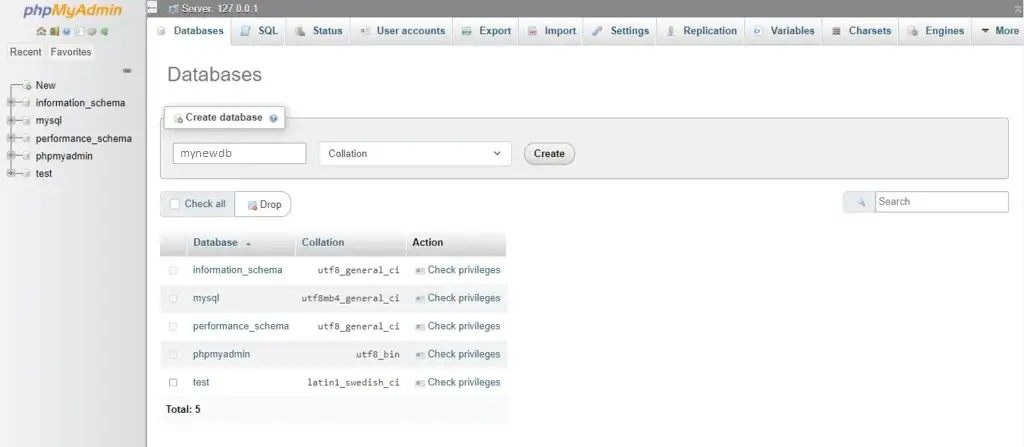
Note: You can usually access PhpMyAdmin at http://localhost/phpmyadmin, depending on your port configuration. For example: http://localhost:80/phpmyadmin/.
4. Start the installation
Now, you are ready to start the installation of Joomla. Start Joomla web installer by using your web browser and accessing the link localhost/yoursitename where “yoursitename” is the name of the folder where you stored the Joomla files.
If you are installing Joomla directly on a live web server, type the link https://www.yoursitename.com where www.yoursitename.com is the domaine linked to your web hosting.
This should display the installation screen.

Joomla will identify and select automatically the installation language according to your web browser settings. You can change this if you want.
Enter the name of your web site (This can be changer anytime you want). Then click Setup Login Data button.
5. Enter the login data
Now, the login data screen will be displayed. Fill in the following information:
- Name of Super User: The name of the super user.
- Super User Account Username: The username of the Super User. You can put anyting you want. It is recommended to avoid “Admin” for security reasons.
- Admin Password: Enter the administrator password to allow the Super User access the Dashboard. Remember that the Super User has total control of the web site and the administration panel. Make sure to set a strong password and remember it.
- Super User Email Address: The Super User valid Email address. This adress is important, it will be used to recover password and to notify the Super User about the website issues, updates, and more…
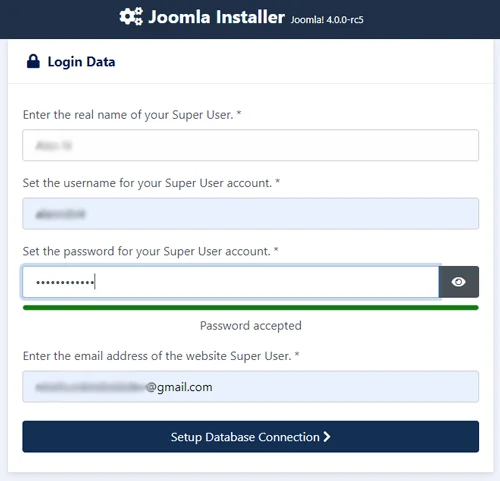
When everything is set in this page, click the Setup Database Connection button.
6. Database configuration
In this step you will be asked to enter the database information:
- Database Type: MySQLi is the common database used
- Hostname Where your database is located. Common is localhost, even on hosting services. However, some hosts use a specific database server such as dbserver1.yourhost.com.
- Username: The username used to connect to the database (Usually for local installation it is “root” by default unless you change it)
- Password: The password for the database user (not your Administrator password). For local installation by default the database has no password (unless you changed it), let this field empty
- Database Name: The name of the database
- Table Prefix: This is generated automatically as a security feature. You can accept the randomly generated default or change it. Just don’t forget to put the underscore character (
_) at the end of the prefix. - Connection Encryption: specifies how the connection to the database should be encrypted. If you don’t know – then it’s best to stick to the default. However this allows enterprises that use one or two way authentication for the database connection to provide it.

All this configurations can be changed later if needed in the Joomla configuration page under Server Options.
When you enter all the data needed, click the Install Joomla button. Then wait until the process is finished.
7. Finishing up the installation
Congratulations! You Joomla site is ready. This is the message you will get when the installation is complete.
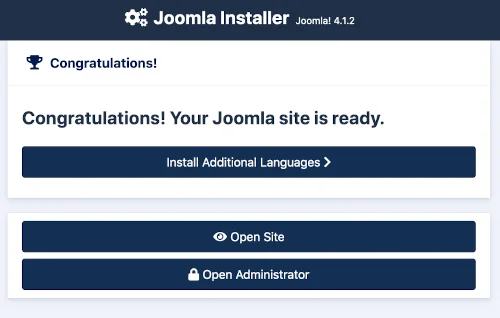
You can click Open Site button to access your fresh installed web site and you can click Open Administrator button to access Joomla administration dashboard.
As part of the installation process of Joomla, you can add more languages before completing the installation. To do this you can click the Install Additional Languages button.
Installing additional languages
When you click the Install Additional Languages button, a list of language packs will be displayed. Select the languages you want to install (It is recommended to install a maximum of 3 languages at once as installing more than 3 at the same time can cause a time out issue. You can install more later) then click Next.

Choose the default language
After finishing the installation of the language packs, you will see the same congratulation page (Congratulations! You Joomla site is ready.) but this time the page will contain the list of installed languages allowing you to select the default one for the site and for the Administration Dashboard.
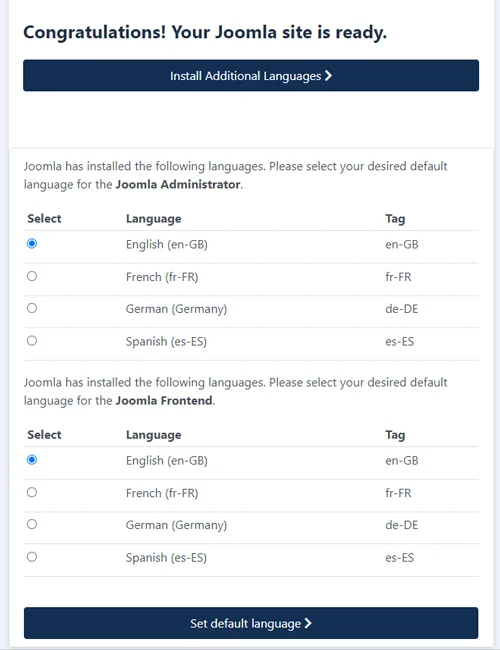
- Select the language you wish to use as default one for the Administration Dashboard
- Select the language you wish to use as default one for the Frontend (the website)
- Click the Set default language button.
- The system will display a confirmation message confirming that Joomla has set the default language for Administration dashboard and for the website.
How to upload your Joomla website to live server
There is two methods for uploading your Joomla website to live server: the manual method by uploading the database and the website files to the new server. Or using a plugin like Akeeba.
The manual method is similar to how you installed Joomla locally on you computer. You will follow the same steps. You will just replace the information provided by the information of your hosting provider (Hoste name, Database name, Database user, Database password, …).
To make your website live using Akeeba plugin, follow the following steps:
Install Akeeba back up plugin on your local Joomla website
- Download Akeeba back up plugin ZIP file from the official Akeeba website or from Joomla Extensions directory
- From the Backend of your Joomla site (Administrator) select Extensions → Install/Uninstall.
- Click the Browse button and select the extension package on your local machine.
- Click the Upload File & Install button.
- Some extensions may provide further instructions on installation.
- Note that modules and plugins must be enabled before they will work.
Back up and upload your website using Akeeba backup
- In the Joomla! administrator back-end, go to Components > Akeeba Backup.
- The first time you open Akeeba Backup, you’re asked if you want to allow it to configure itself. Click Configuration Wizard to continue with the automatic configuration.
- The Configuration Wizard completes a series of benchmarking and configuration tasks. When it’s finished, you can create your first backup, do additional configuration, or schedule automatic backups.
- Once the backup is complete, you will find the backup file in your local website’s directory. Copy this file to the new web server.
- Also, download the kickstart package from the Akeeba official website and copy it in the same directory (on the live server) as the backup file.
- Then access the live website using a web browser. Once you try to access the site, the installation wizard will start. Follow the guided steps to complete the installation.
Note that the installation using Akeeba is almost similar to the normal installation of Joomla.


